1) CSS 를 HTML에 적용시키는 방법
※ 각 방법은 장단점이 있으니 상황에 맞게 적절한 방법 택하기!
① Inline Style Sheet : HTML 태그의 style 속성에 CSS 코드를 넣는 방법
<p style="color: blue">Lorem ipsum dolor.</p>해당 태그(위 코드에서는 p)가 선택자(selector)가 되고, CSS 코드에는 속성(property)과 값(value)만 들어감. 따라서 꾸미는 데 한계가 있으며, 재사용이 불가능하다는 단점이 있다.
② Internal Style Sheet : HTML 문서 안의안에 CSS 코드를 넣는 방법
<style>
  h1 {
    color: blue;
  }
</style>
<style> 태그는 보통 <head>와 </head> 사이에 넣으나, HTML 문서의 어디에 넣어도 잘 적용된다. 이 방법은 HTML 문서 안의 여러 요소를 한번에 꾸밀 수 있다는 장점이 있으나, 또 다른 HTML 문서에는 적용할 수 없다는 단점이 있다.
③ Linking Style Sheet : 별도의 CSS 파일을 만들고 HTML 문서와 연결하는 방법
적용을 원하는 HTML 문서에 다음의 코드를 추가
<link rel="stylesheet" href="style.css">위 코드는 HTML 파일과 CSS 파일이 같은 폴더에 있다고 가정했을 때의 코드로, 경로는 적절히 수정해야 한다. 예를 들어 HTML 문서가 있는 폴더에 css 폴더가 있고, 그 안에 style.css 파일이 있다면 다음과 같이 해준다.
<link rel="stylesheet" href="css/style.css">이 방법의 장점은 여러 HTML 문서에 사용할 수 있다는 것. style.css를 적용시키고 싶은 문서에 <link> 태그로 연결만 해주면 된다.
2) CSS Basic Grammer
h1 {
  color: red;
  /*font-size: 20px;*/
}
① 선택자(selector) : 무엇을 꾸밀지 정한다. h1은 h1 요소를 꾸미겠다는 뜻
② 속성(property) : 어떤 모양을 꾸밀지 정한다. color는 색을 꾸미겠다는 뜻
③ 값(value) : 어떻게 꾸밀지 정한다. red는 빨간색으로 만들겠다는 뜻
④ 주석(Comment)은 /*과 */ 사이에 쓴다.
※ 세미콜론(;)으로 구분하여 선언을 여러 개 넣을 수 있다.
4) CSS Selectors
① 전체 선택자(Universal Selector) : 모든 HTML 요소를 선택합니다. 별표(*)로 나타냄
② 아이디 선택자(ID Selector) : 특정 값을 id 속성(attribute)의 값으로 갖는 요소(element)를 선택. 속성값 앞에 #을 붙여 아이디임을 나타냄
③ 클래스 선택자(Class Selector) : 특정 값을 class 속성(attribute)의 값으로 갖는 요소(element)를 선택. 속성값 앞에 .을 붙여 클래스임을 나타냄.
④ 타입 선택자(Type Selector) : h1, p, div, span 등 HTML 요소(Element)를 선택하는 선택자
<속성에 따른 우선순위 정리>
- 속성 값 뒤에 !important 를 붙인 속성 ex. .mytitle { color : black !important ; }
- HTML에서 style을 직접 지정한 속성 ex. <h1 style = “color : white”>(head에 있는 style이 아니라 body에 있는 특정 코드에 style을 직접 적용)
- #id 로 지정한 속성
- 클래스,추상클래스로 지정한 속성 ex. .mytitle : hover {___}
- 태그이름 으로 지정한 속성 ex. .h1 { color : red ; }
- 상위 객체에 의해 상속된 속성 (부모-자식 구조)
그렇기 때문에 CSS에선 선택자(selector)와 선언부(declaration)를 적절하게 잘 사용할 수 있어야 한다.
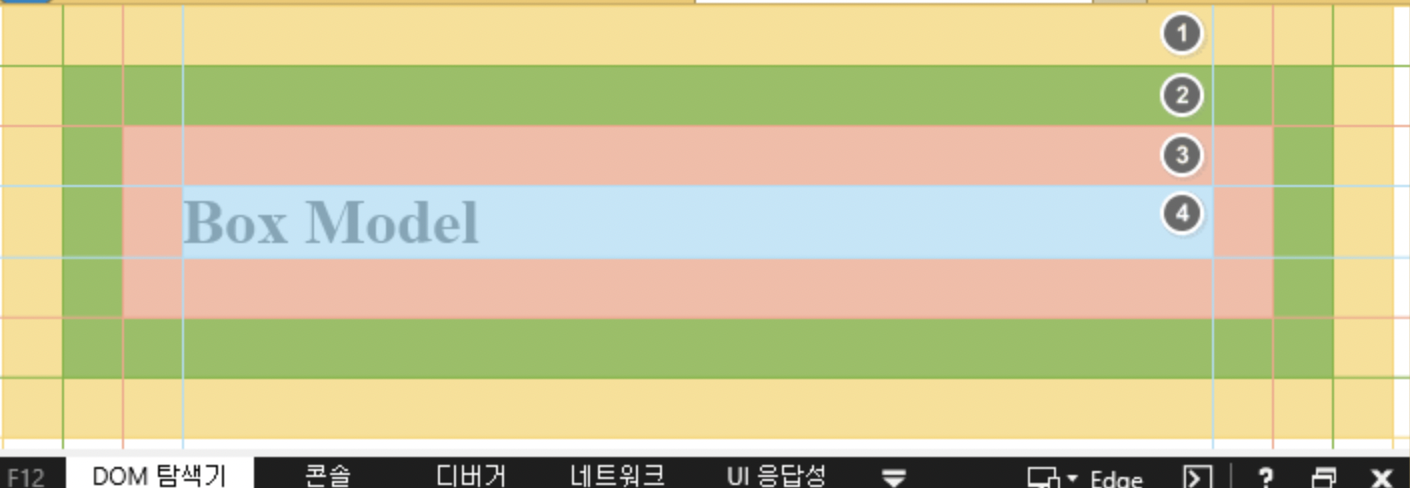
5) Box Model

색이 있는 모든 영역이 h1 요소. 각 색이 나타내는 영역은 다음과 같다.
- ① : 바깥 여백 영역(Margin Area)
- ② : 테두리 영역(Border Area)
- ③ : 안쪽 여백 영역(Padding Area)
- ④ : 내용 영역(Content Area)
각 영역을 꾸밀 때 사용하는 속성은 다음과 같다.
- 바깥 여백 : margin 속성
- 테두리 : border 속성
- 안쪽 여백 : padding 속성
- 박스의 가로 크기 : width 속성
- 박스의 세로 크기 : height 속성
- 박스의 크기 기준 : box-sizing 속성
- 박스의 배경 : background 속성
6) Grid
- CSS Grid Layout excels at dividing a page into major regions or defining the relationship in terms of size, position, and layer, between parts of a control built from HTML primitives.
- Like tables, grid layout enables an author to align elements into columns and rows.
- However, many more layouts are either possible or easier with CSS grid than they were with tables.
- For example, a grid container's child elements could position themselves
- so they actually overlap and layer, similar to CSS positioned elements.
7) Media Queries
Media queries can be used to check many things, such as:
- width and height of the viewport
- width and height of the device
- orientation (is the tablet/phone in landscape or portrait mode?)
- resolution
Using media queries are a popular technique for delivering a tailored style sheet to desktops, laptops, tablets, and mobile phones (such as iPhone and Android phones).
출처 :
https://www.codingfactory.net/
CODING FACTORY
코딩 공부 블로그
www.codingfactory.net
https://www.youtube.com/c/%EC%83%9D%ED%99%9C%EC%BD%94%EB%94%A91
생활코딩
일반인에게 프로그래밍을 알려주는 온라인/오프라인 활동 입니다. 채널 공개키 : MIGfMA0GCSqGSIb3DQEBAQUAA4GNADCBiQKBgQDbU/jgeYLWbmUB5pk/wlqMs+2qsOOPgN2ydxOsrWe8JJUXzj5ovsUmjfBSwLjajT6SyO00ulne3zja2PzEZC2wnJCgvZ6lr/ZLvA9yUqmrKRNa
www.youtube.com
